thalinnias
-
Posts
3 -
Joined
-
Last visited
Content Type
Profiles
Forums
Servers
Downloads
Gallery
Everything posted by thalinnias
-
[Tutorial] Custom Races for 5.4.8 MoP client and server
thalinnias replied to thalinnias's topic in General
If you use a race above Pandaren_Horde entry in the SharedDefines.h the races will be greyed out. If you followed the guide and it's still greyed out maybe try to recompile or rebuild it as it should work right away -
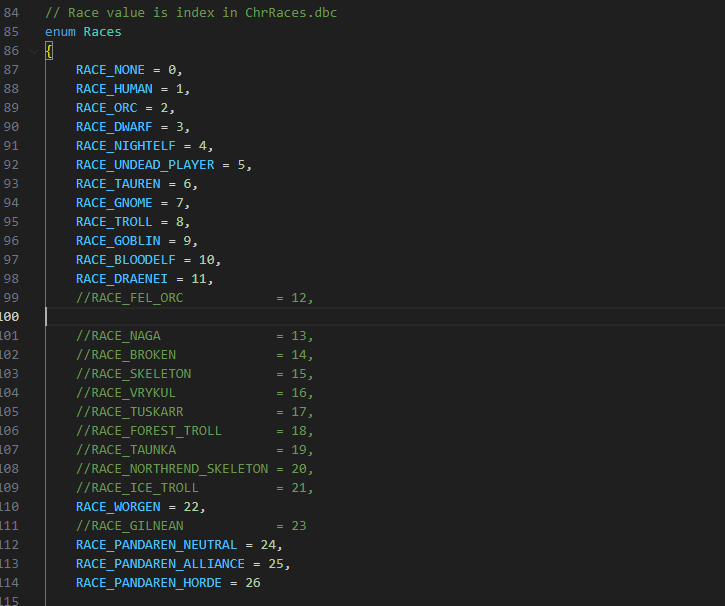
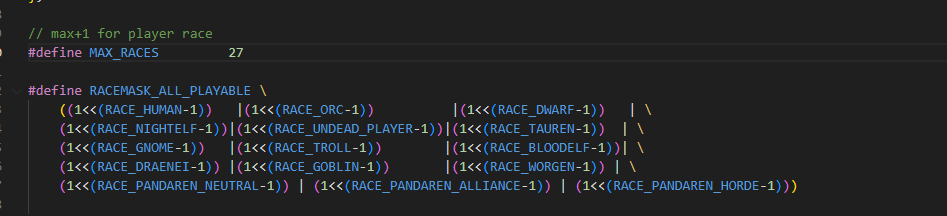
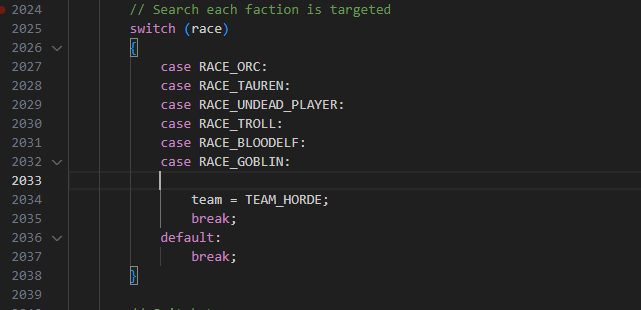
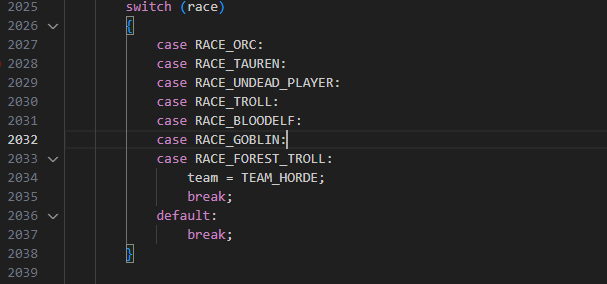
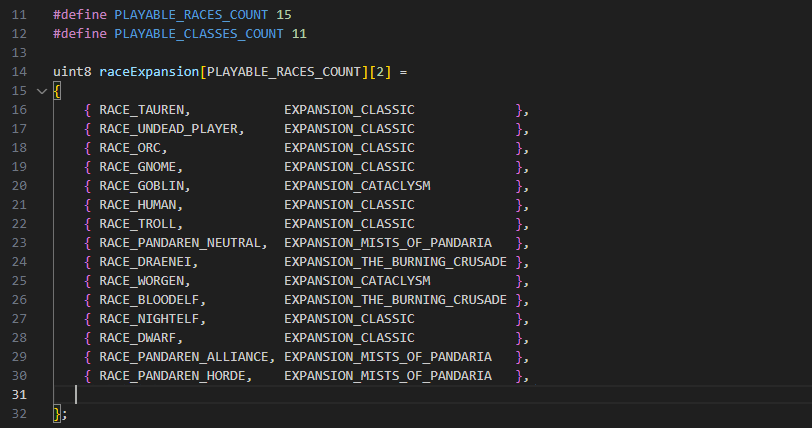
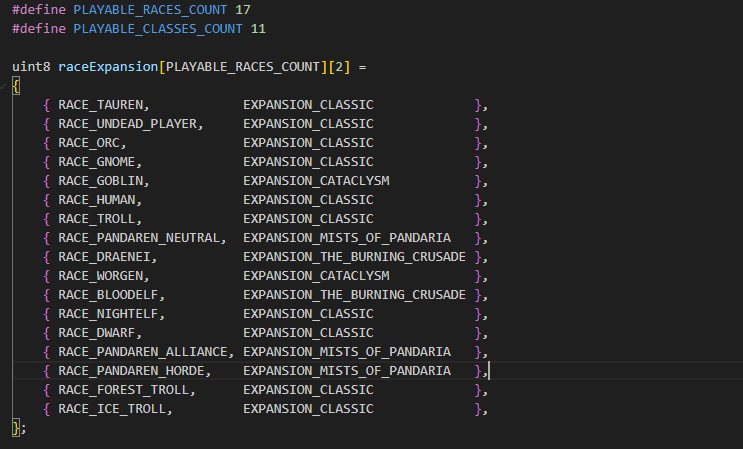
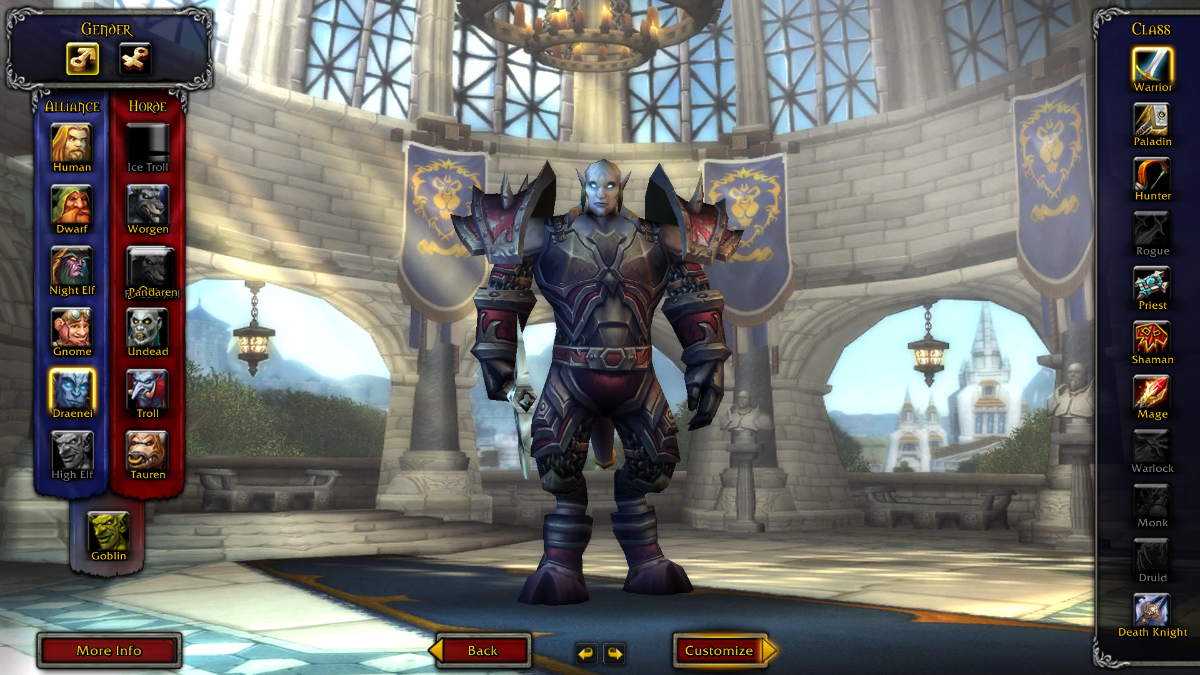
Hello guys! Hope you are all having a good day. Ever since I played Mists of Pandaria I always wanted to see other races, this particular expansion had so much (or still has) potential for other races, The Hozen for the Horde and the Jinyu for the Alliance not to mention that we saw more involvement of the High Elves with the Alliance in the Isle of Thunder. There was a recent surge of Custom servers with Custom races or custom skins but they are all always for 3.3.5 or below, nothing for 4.3.4 or 5.4.8 sadly... So I decided to take matters in my own hands and go down the rabbit hole of creating custom races to Mists of Pandaria. This tutorial MIGHT seem hacky at times or not very in depth, the focus of the tutorial will be to allow you to enable the races and toy with them, customizing them to be 100% (some of them are missing animations or have messed up interfaces) playable and almost Blizzlike takes time and cannot be explained in a single tutorial FIRST STEP: CORE: As a first step you should have your preferred core ready and if possible tested and compiled already for your 5.4.8 Server, at this moment the one that works pretty okay and the one I'm gonna be using for this tutorial is Project Skyfire. You need to go to your core files and find: src/server/game/Miscellaneous/SharedDefines.h and scroll down until you find this: This is where we need to add or enable, for simplicity I will enable the Forest and Ice trolls, just delete the // and make sure they are enabled. After that we scroll down and we will find this: Since we haven't add anything after Pandaren horde 26 we can leave the max races as 27 and change the define racemask_all_playable like this: Keep the structure of the code in mind, every three races we separate them with | \ and the very last one ends with ))) Next up we have this: We change it like this: If we don't declare a race in Racemask alliance they will default to the Horde faction, keep that in mind. We are done with SharedDefines.h remember to save and let's continue with src\server\game\Handlers\CharacterHandler.cpp and find the following lines: Change them to: Then the last file in the core will be located in: C:\Skyfire\SkyFire_548\src\server\game\Handlers\AuthHandler.cpp and find these lines: Change it to: That would be all for the core files, save them all and continue to recompile your server. SECOND STEP: DBCs : For now I will only show you the 2 most important DBC files, there's a ton more of them but those have to be customized as your prefer, for the functionality of the races to appear as enabled we can work with ChrRaces.DBC and CharBaseInfo.DBC. You can use any DBC editor that works for 5.4.8, I personally use WBDX Editor 1.1.9.a For ChrRaces.DBC I STRONGLY suggest you check this wiki first for: ChrRaces.DBC For ChrRaces.DBC Find the line 18 and line 21: And change them to this: Save and close this DBC. Next up is CharBaseInfo.DBC For this one is easy, you just need to add 2 new entries at the end: 18, 1 21, 1 This will enable the Warrior class for both the forest troll and ice trolls. By now the races will be enabled and visible on your client, but we need to show them in the interface to be able to select them for that we will modify these files: CharacterCreate.lua CharacterCreate.XML For CharacterCreate.lua open it and you will need to find this: MAX_RACES = 13; Change it to: MAX_RACES = 15; Then scroll down and find: Add the following lines below that: Next will be CharacterCreate.XML Find the following lines: <Frames> <CheckButton name="CharCreateRaceButton1" inherits="CharCreateRaceButtonTemplate" id="1"> <Anchors> <Anchor point="TOP" relativePoint="TOP" x="-43" y="-136"/> </Anchors> </CheckButton> <CheckButton name="CharCreateRaceButton2" inherits="CharCreateRaceButtonTemplate" id="2"> It should be somewhere around line 1119 Change everything inside frames up until /frames with this code: <CheckButton name="CharCreateRaceButton1" inherits="CharCreateRaceButtonTemplate" id="1"> <Anchors> <Anchor point="TOP" relativePoint="TOP" x="-43" y="-136"/> </Anchors> </CheckButton> <CheckButton name="CharCreateRaceButton2" inherits="CharCreateRaceButtonTemplate" id="2"> <Anchors> <Anchor point="TOPLEFT" relativeTo="CharCreateRaceButton1" relativePoint="BOTTOMLEFT" x="0" y="-20"/> </Anchors> </CheckButton> <CheckButton name="CharCreateRaceButton3" inherits="CharCreateRaceButtonTemplate" id="3"> <Anchors> <Anchor point="TOPLEFT" relativeTo="CharCreateRaceButton2" relativePoint="BOTTOMLEFT" x="0" y="-20"/> </Anchors> </CheckButton> <CheckButton name="CharCreateRaceButton4" inherits="CharCreateRaceButtonTemplate" id="4"> <Anchors> <Anchor point="TOPLEFT" relativeTo="CharCreateRaceButton3" relativePoint="BOTTOMLEFT" x="0" y="-20"/> </Anchors> </CheckButton> <CheckButton name="CharCreateRaceButton5" inherits="CharCreateRaceButtonTemplate" id="5"> <Anchors> <Anchor point="TOPLEFT" relativeTo="CharCreateRaceButton4" relativePoint="BOTTOMLEFT" x="0" y="-20"/> </Anchors> </CheckButton> --wargen <CheckButton name="CharCreateRaceButton6" inherits="CharCreateRaceButtonTemplate" id="6"> <Anchors> <Anchor point="TOPLEFT" relativeTo="CharCreateRaceButton5" relativePoint="BOTTOMLEFT" x="0" y="-20"/> </Anchors> </CheckButton> --icetroll <CheckButton name="CharCreateRaceButton7" inherits="CharCreateRaceButtonTemplate" id="7"> <Anchors> <Anchor point="TOPLEFT" relativeTo="CharCreateRaceButton6" relativePoint="BOTTOMLEFT" x="0" y="-20"/> </Anchors> </CheckButton> --orc <CheckButton name="CharCreateRaceButton8" inherits="CharCreateRaceButtonTemplate" id="8"> <Anchors> <Anchor point="TOP" relativePoint="TOP" x="43" y="-136"/> </Anchors> </CheckButton> <CheckButton name="CharCreateRaceButton9" inherits="CharCreateRaceButtonTemplate" id="9"> <Anchors> <Anchor point="TOPLEFT" relativeTo="CharCreateRaceButton8" relativePoint="BOTTOMLEFT" x="0" y="-20"/> </Anchors> </CheckButton> <CheckButton name="CharCreateRaceButton10" inherits="CharCreateRaceButtonTemplate" id="10"> <Anchors> <Anchor point="TOPLEFT" relativeTo="CharCreateRaceButton9" relativePoint="BOTTOMLEFT" x="0" y="-20"/> </Anchors> </CheckButton> --trll <CheckButton name="CharCreateRaceButton11" inherits="CharCreateRaceButtonTemplate" id="11"> <Anchors> <Anchor point="TOPLEFT" relativeTo="CharCreateRaceButton10" relativePoint="BOTTOMLEFT" x="0" y="-20"/> </Anchors> </CheckButton> <CheckButton name="CharCreateRaceButton13" inherits="CharCreateRaceButtonTemplate" id="13"> <Anchors> <Anchor point="TOPLEFT" relativeTo="CharCreateRaceButton11" relativePoint="BOTTOMLEFT" x="0" y="-20"/> </Anchors> </CheckButton> <CheckButton name="CharCreateRaceButton12" inherits="CharCreateRaceButtonTemplate" id="12"> <Anchors> <Anchor point="TOPLEFT" relativeTo="CharCreateRaceButton13" relativePoint="BOTTOMLEFT" x="0" y="-20"/> </Anchors> </CheckButton> <CheckButton name="CharCreateRaceButton14" inherits="CharCreateRaceButtonTemplate" id="14"> <Anchors> <Anchor point="TOPLEFT" relativeTo="CharCreateRaceButton12" relativePoint="BOTTOMLEFT" x="0" y="-20"/> </Anchors> </CheckButton> --panda <CheckButton name="CharCreateRaceButton15" inherits="CharCreateRaceButtonTemplate" id="15"> <Anchors> <Anchor point="BOTTOM" x="-2" y="-574"/> </Anchors> </CheckButton> After that save and let's continue with the last part of the tutorial. FIFTH STEP: MPQs and SQL We are almost done! What comes next should be relatively easy: First grab your favorite MPQ file editor, I just use MPQEditor. Create a new MPQ and name it wow-update-enUS-20000.MPQ. Create 2 folders inside that one, Interface and DBFilesClient. create a third one inside Interface called GlueXML. Put CharacterCreator.LUA and CharacterCreator.XML inside GlueXML Put ChrRaces.DBC and CharBaseInfo.DBC inside DBFilesClient. Now put that MPQ file inside Pandaria/Data/Locale (locale is the language of your client, for me it would be EnUS) drag and drop it there. You will need a patched WoW.exe I will put the one I use here: WoW.Exe Now launch your server and game, log in and... ta da! You will see this: the Ice Troll and Forest Troll will be both enabled. But something is still missing, we need to insert some stuff in the database first: Make a query in the world database for your server and put this in: Run this: insert into `playercreateinfo` (`race`, `class`, `map`, `zone`, `position_x`, `position_y`, `position_z`, `orientation`) values('18','1','1','14','-618.518','-4251.67','38.718','1'); insert into `playercreateinfo` (`race`, `class`, `map`, `zone`, `position_x`, `position_y`, `position_z`, `orientation`) values('21','1','0','12','-8949.95','-132.493','83.5312','0'); Run that and then run: SET @NEW_RACE = 18; SET @NEW_CLASS = 1; SET @COPY_RACE = 2; DELETE FROM `player_levelstats` WHERE race = @NEW_RACE AND class = @NEW_CLASS; INSERT INTO `player_levelstats` (`race`, `class`, `level`, `str`, `agi`, `sta`, `inte`, `spi`) SELECT @NEW_RACE, @NEW_CLASS, `level`, `str`, `agi`, `sta`, `inte`, `spi` FROM `player_levelstats` WHERE race = @COPY_RACE AND class = @NEW_CLASS; Run that and then run: SET @NEW_RACE = 21; SET @NEW_CLASS = 1; SET @COPY_RACE = 1; DELETE FROM `player_levelstats` WHERE race = @NEW_RACE AND class = @NEW_CLASS; INSERT INTO `player_levelstats` (`race`, `class`, `level`, `str`, `agi`, `sta`, `inte`, `spi`) SELECT @NEW_RACE, @NEW_CLASS, `level`, `str`, `agi`, `sta`, `inte`, `spi` FROM `player_levelstats` WHERE race = @COPY_RACE AND class = @NEW_CLASS; Run that and then run: SET @NEW_RACE = 18; SET @NEW_CLASS = 1; SET @COPY_RACE = 2; DELETE FROM `playercreateinfo_action` WHERE race = @NEW_RACE AND class = @NEW_CLASS; INSERT INTO `playercreateinfo_action` (`race`, `class`, `button`, `action`, `type`) SELECT @NEW_RACE, @NEW_CLASS, `button`, `action`, `type` FROM `playercreateinfo_action` WHERE race = @COPY_RACE AND class = @NEW_CLASS; Run that and then run: SET @NEW_RACE = 12; SET @NEW_CLASS = 1; SET @COPY_RACE = 1; DELETE FROM `playercreateinfo_action` WHERE race = @NEW_RACE AND class = @NEW_CLASS; INSERT INTO `playercreateinfo_action` (`race`, `class`, `button`, `action`, `type`) SELECT @NEW_RACE, @NEW_CLASS, `button`, `action`, `type` FROM `playercreateinfo_action` WHERE race = @COPY_RACE AND class = @NEW_CLASS; That's it! You are done, by now you will be able to create the race and test it out, see what is missing and what can be fixed, the races won't be able to speak, they won't have female characters and some animations might be broken, but that is a whole other section that it's better to be found by your own research, it's all in the DBC files! Thank you! I hope this works, if you want to re write this tutorial and make it better PLEASE do! If you have any helpful advice to do something better and easier PLEASE do! I'm fully open to feedback and I will try as much as I can to troubleshoot any issues you might encounter, I'm still a noob at wow modding but I will try my best! Cheers! Credits: ragestriker on Discord, HUGE help, he helped me found that we also need to edit AuthHandler and CharacterHandler for the races to be enabled. He also helped a LOT with the interface! Cheers to them This guide in: http://web.archive.org/web/20200203073723/https://www.ac-web.org/forums/showthread.php?181048-How-to-Custom-Races! This guide in: https://wowcreador.com/threads/tutorial-creacion-razas-custom-3-3-5a-tc-parte-1-4-core.987/ EmuCoach Discord Server WoW Modding Discord Server

- 5 replies
-
- 4
-

-

-
- mop
- custom races
- (and 5 more)
-
Hello team! I been trying to add some custom races to a 5.4.8 MoP server, however, no matter what I try I can't get them to work, they appear as grey (high elf and ice troll): I tried all configurations in the ChrRaces.DBC and all other files with no luck, am I missing something? I can send the DBC files if needed. Thank you team!