Meta
-
Posts
26 -
Joined
-
Last visited

Meta's Achievements
")
Private / Scout (1/14)
0
Reputation
-
I said it in january, I did it in June but it's finally here ! In this tutorial I'll explain to you how to clone particles from a model to another one with the help of ParticleCloner, a tool made by Tigurius. This tool is old, so it doesn't work with Cata+ models since the structure of the m2's has changed. I didn't tried with spell models from Cata and up (only doodads or creatures), maybe it's different and it can work, but not sure. EDIT : it can load WoD or Legion models, but it's pretty random, if the models are similars it can work, sometimes not, just do some tests and try. What programs do we need ? - ParticleCloner - 010 editor (with m2 template) What's the process ? First, choose the particles you need in WowModelViewer on the model that you want. For this tuto I choose particles from the spell Arcane_form_precast.m2 to put on 2 models, one without bones or animations, and one with both : misc_2h_pitchfork_a_01.m2 and sheep.m2 . To make the transfert, select first the "destination" model, CTRL+left click to select the second "source" model and drag&drop on the application. (Always do backups if you did it in the wrong way, this program overwrite the original file ! ) When it's done, you'll have the particles at the same place of its original model. Now, you certainly want to move the particles to the right place. Open the m2 with 010editor and load the M2 Template. Go to the end of the file at the line " struct Particle ". You'll have all the informations you need, the attached bones, coordinates, etc... Particles have the bone from the original model, for a simple animation like this, there's only one bone. For this fire, there's three elements (flames, smoke and sparks), so there's 3 bones. I used it for a Sargeras model. You have to set the number of the bone where you want the particles to be. To move it to the right place, go to the " struct FloatVec3 pos " line. As you can see on the picture above, I modified the values on the x axis. You can change what you want to have the good coords. Just try and retry with the help of WMV to visualize the result. For the sheep, I set the particles on bone 3 who's attached to the head. This tool can copy the texture path of the BLPs used by the particles. But when you'll go ingame to see if it works, you'll have little cubes instead of the texture. WMV can load them, but not WoW. Why ? Because the tool does some mess too. In the " struct VModelFileName " 1 & 2, you have random symbols at " struct filename texture > string value " . Delete all and reload the template, or save and close the model. Do it for each particle in your model. And it's finally done ! Good job, you can manage particles ! PS : for unknown reasons, my fork is invisible ingame after I added the particles on it. Maybe because the model doesn't have enough "informations" in it because it's a little model, or because there's no bones in the original model. I don't know. Maybe one of you will find the solution ?
-
Hi fellows, long time ago I discovered an interesting workshop on youtube with a guy who worked in game industry with famous enterprises like Blizzard and Ubisoft. Here, he teaches to a class of students how to paint textures from scratch for low poly models with a cartoonish style. There's tons of videos about texturing on the web, but this workshop is particulary helpful because this guy, Jamin Shoulet, gives some tips and talks about experiences, techniques, etc... Plus, you can work "with him" in the same time, like the others students because it's not a timelapse. Have a good class !
-
Comment convertir un modèle 3D cutom en m2 pour l'ajouter dans le jeu. Tout d'abord, voici la liste des programmes requis: Blender (ou tout autre logiciel de 3D permettant de modéliser et exporter en .3ds, néanmoins Blender reste nécessaire pour l'exportation en .obj si vous ne pouvez pas exporter avec votre programme habituel en ayant les mêmes options) OBJtoM2 (Disponible ici) BLPtoPNG (Disponible ici ou autre logiciel permettant la conversion de png en blp) MPQeditor (Disponible ici) World of Warcraft (oui, je pense que c'est nécessaire :D) Et bien-sûr, son cerveau avec un peu de jugeote :troll: Étape 1: La modélisation Bon, ici je ne vais pas vraiment vous apprendre quelque chose, je fais ce tuto en supposant que vous ayez déjà quelques bases sur Blender. Si ce n'est pas le cas, cette personne s'en chargera bien mieux que moi. On va donc commencer par simple : la légendaire et basique......Boîte! Jusqu'ici, rien de bien compliqué, vous pouvez même remplacer cette jolie caisse par le modèle de votre choix. Une fois votre modèle texturé et prêt à l'exportation, vérifiez bien le nom de votre matériel car celui-ci déterminera le nom de votre texture blp ❗ Étape 2: L'exportation Maintenant, exportez votre modèle en .3ds (cela va servir à maximiser la compatibilité pour la conversion et à trianguler vos faces par la même occasion) Une fois fait, réimportez-le dans blender et remettez la texture à sa place (remarquez comme les faces ont été converties en triangles) Il est maintenant temps de l'exporter en .obj pour passer dans le convertisseur (attention à respecter les options cochées) Étape 3: La conversion Pour convertir votre modèle, copiez OBJtoM2.exe dans le même dossier que votre fichier. Vous devrez également créer un nouveau fichier texte dans ce même dossier (avec le nom que vous voulez) qui servira de "starter" pour lancer l'application. Attention, ce fichier texte devra contenir des informations bien précises: Enregistrez ensuite votre fichier avec l'extension .cmd pour qu'il devienne un exécutable. Une fois tout bien préparé, vous n'avez plus qu'à lancer l'application via le cmd. Une fenêtre de commande devrait s'ouvrir puis se refermer une fois la conversion terminée. Vous devriez normalement voir apparaître votre m2 et son skin dans votre dossier. Il ne reste plus qu'à vérifier si tout s'est bien déroulé comme prévu en l'ouvrant avec un éditeur hexadécimal (ici j'utilise 010editor). Si vous regardez le nom et le chemin de la texture, vous verrez que c'est bien le nom de votre matériel sur blender, avec l'extension .blp qui vient s'ajouter automatiquement. PS: n'oubliez pas de convertir votre texture en BLP. Étape 4: Compilation du patch et vérification J'espère au moins que vous savez comment faire un patch. Maintenant ouvrons WowModelViewer pour voir si notre conversion est un succès. (et je crois bien que oui chers amis) Voilà! Vous avez réussi à convertir votre modèle custom en m2, félicitation! Mais que donne-t-il en jeu? Et bien il n'y a même pas à s'inquiéter pour les collisions, ce joli bijou de programme s'en occupe pour vous! Petit infos complémentaires Je viens de vous montrer comment convertir un modèle qui n'utilise qu'un seul matériel (donc une seule texture, un seul geoset). Mais qu'en est-il des modèles qui en ont plusieurs? Et bien c'est la même chose. Voyez ici notre belle boîte avec un objet exclusif posé dessus. Vous avez donc ici plusieurs geosets et textures. Il suffit de répéter la même opération que ci-dessus (en pensant bien à changer les informations dans le .cmd) et vous pouvez constater que les deux sont bien ajoutées. Et vous avez un beau résultat dans votre WMV
-
Hi guys, someone asked how to import models from HotS to blender, but this 3D software doesn't have a lot of plugins to do it. I'll share with you my researches and how I personally do it for me. Tools CascView Blender Addons for Blender (links in the section dedicated to this program) Heroes of the Storm game folder 3DSmax 2012 and up (for the second technique)(if you take a lower version, you'll need an older plugin) This addon for 3DSmax Extract models from the game First, you need to have the game installed. Open the Casc Viewer, click on Game Storage, and select your game folder. Now, explore the folders and choose the model that you want. In my case I'll take Uther. Now, right-click (or F5) on it to extract the model. Choose your folder and save it. Direct to Blender I've searched on the web after some plugins for Blender, but have not managed to make them work. Some are too old, others not compatibles, etc... The new M3 file format from HotS is a little bit different of M3 files from StarCraft, so SC modders are using a converter to make the models compatible with their tools.. Heroes M3 To Sc2 M3 Converter Here's some M3 blender plugins, maybe you'll have more chance than me to make them work : This one is 5 years old, so I think it can possibly work with older versions of Blender. This second seems more complete and more up to date. This last is normally compatible with the 2.71 version. Sadly, no one was working for me (and I don't have time to test all blender versions with all plugins), so I've chosen the second solution. EDIT (better solution): To Blender with 3DSmax 3DSmax part I don't really like this program for now, I have not taken the time to understand all the tools, but I can use it for simple things. So first, open 3DSmax. Click on the MAXScript pannel and choose Run Script. In the new window, you'll see the scripts that you can run. You can just drag and drop the M3 addon in this folder, or add it manually in your program folder (in my case " C:\Program Files\Autodesk\3ds Max 2013\scripts " ). And open it. Go to the right side of your screen, in the tools section. Switch to Utilities and click on MAXScript. Scroll down to see the new pannel called TM's M3 Import (v2.1) and choose Select file. Choose your file and open it. Once your file is selected, check what you want to keep in the model (bones, animations, etc...) and import it. Now you have your model. You can export it in *.obj file, click on the Autodesk logo and choose export. Choose a name and the file format to open in Blender later. Blender part Now launch Blender, go to import option and open your file. And here it is ! In my case, I have a blue pill (hitbox). Your *.obj will be like a *.fbx, it will keep all the informations like materials, bones, and animations. Just keep and remove what you want. And voilà. After that you can work on the modell as you wish. Let's paint Uther with abdalrahman9's technique. (all the red is the material color, not the weight paint) And I rework the face to fit well with the human model. I hope it was helpful, and good luck.
-
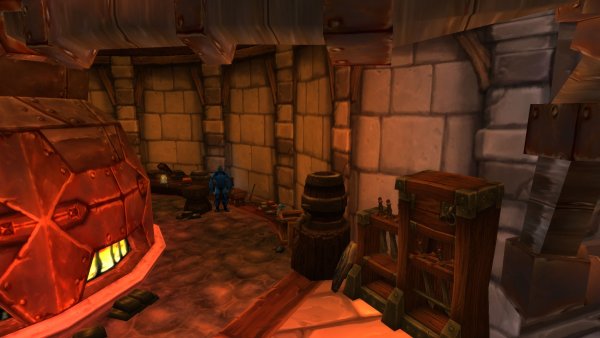
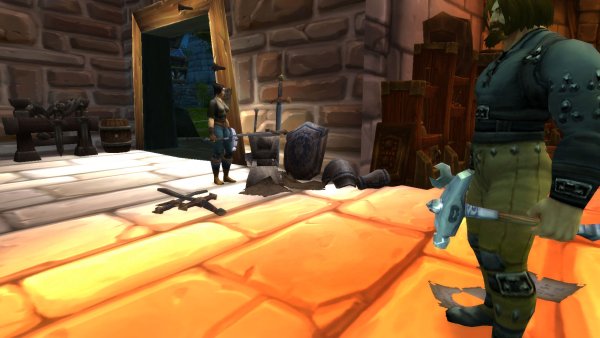
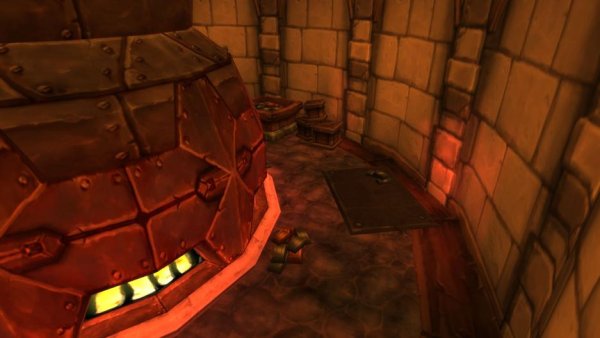
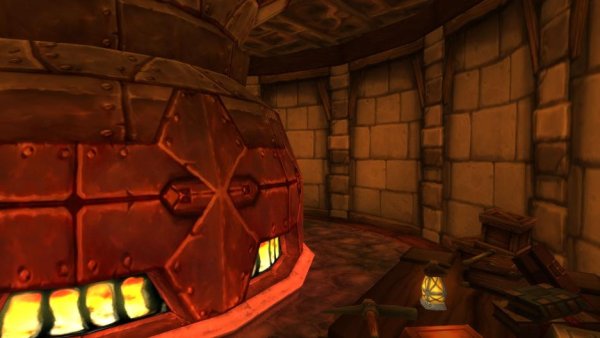
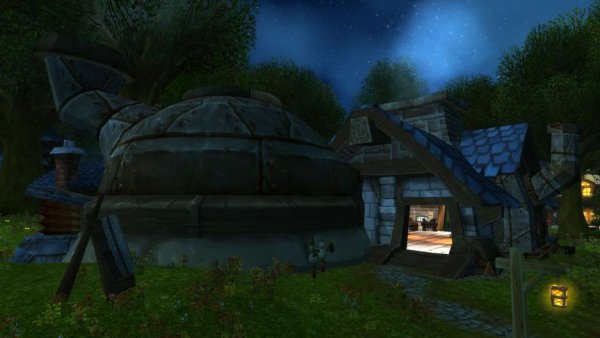
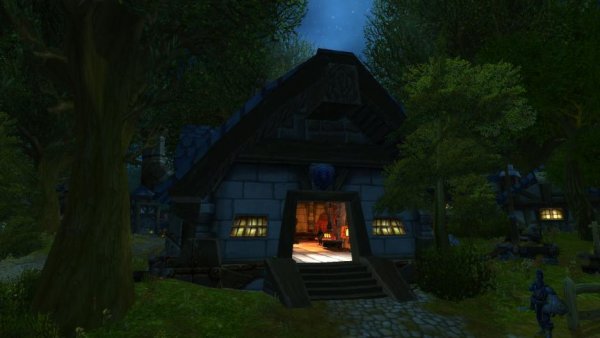
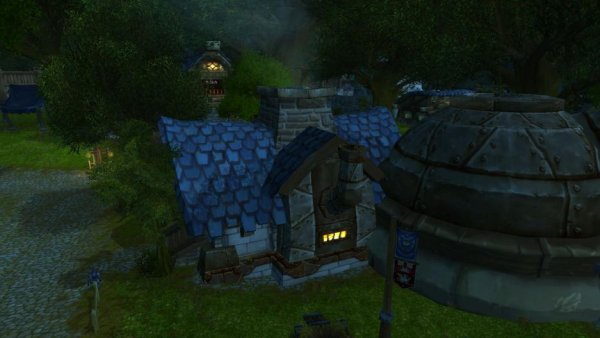
Hi model-changing.net ! I'm happy to share with you my knowledges about custom wmo's. After months of research and work, I've decided to make a tutorial for those who want to make their own wmo's. Special thanks to stan84, Supora, Waveworms (from Modcraft) and other peoples who helped me. Tools Used Summary Blender (you can use another 3D program) Notepad++ 010 editor 010 editor templates MODRChunk file BLPconverter MirrorMachine MPQ editor WMO editor 1] Build the model before conversion 2] Conversion of *.obj to *.wmo 3] Add some doodads with WMOeditor 4] Add a doodadset 5]Additional informations 1) Use textures with transparency 2) Collisions 3) Adding lights 4) Coming soon and WIP... 6] Import/Export & edit wmos with Blender (by Skarn) 1]Build the model before conversion To begin, you should know what you want to do. Do some research to find references that will help you give more "credibility" to your building. If you work in a particular architectural style, do not hesitate to find your inspiration from photography, if you are not in a specific style look anyway how Blizzard constructed houses, castles, and other buildings, so your model fits well and is coherent with its environment. The style of Blizzard is particular with its distortions and its side a little "used". I will not teach you how to make 3D models (I'm not a professional) but I will give you some tips to make it a little bit "optimized" for WoW. Here I am working on new models of houses for Kul Tiras. The island is in a Mediterranean / Tuscany theme, I did some research to see how the houses are built in these regions. To be sure that your home is at the right scale, you can use (and it is even advisable) the human model humanmalescale.m2 (because it is the "basic" scale in WoW), but open it large enough for passing a Tauren because it must be accessible to all races (a Tauren can enter in a human house without much problem because of its wide input) . The goal is that the player's camera could pass without taking the door jamb in the head. Don't forget to delete useless faces. For your model is well composed, it takes several geosets, the number varies depending on the number of "large parts" (as the capitals for example, who have a lot, by districts, house interiors, etc ...). For mine, I based on basic models of human houses, so it will be two geosets: inside and outside. For the instance of Gnomeregan the model has 73 geosets, because it's a big model. Each rooms and tunnels are geosets, sometimes divided into several parts. This palace (from Phantomx) has 63727 polygons and 58997 faces, it's a really huge model ingame, but it has only 24 geosets. In fact, the number of geosets really depends on how you organize your model, you can't have a wmo with only one geoset if it's a big piece because MirrorMachine can't convert it, you must divide it. To have a better render with light and shadows, remember to apply the smooth shading on the concerned parts (mainly for use on curved surfaces, straight walls don't necessarily need it). 2]Conversion of *.obj to *.wmo We will go to the conversion of the model. First, save it in .obj with the correct options as below. Once done, you have two files: your model in .obj and a .mtl file with informations about materials and textures. Open the .mtl file with your notepad, you will see the names of materials and patchs of the textures used. Simply change for that of .blp's in the mpq patch. Do it for each texture. (Insert the extension .blp instead of .jpg or .png it's not really important because the converter will add it automatically) When finished, save and close the .mtl and open MirrorMachine to convert your .obj in .wmo . Select "OBJ File " instead of "WMO v14 ", "Open File " to select and open your model, "Settings " to check that your options are much like on this screenshot. Click "Start Convertion", if your model is well built, it should work without problems. After conversion, you must have your wmo + his group files (the 00 .wmo) corresponding to geosets, so I have two in my case. To verify that the paths of the textures are good, open your wmo main file in 010 editor with wmo template. Here you can see that's good. Once everything is checked, you just have to put it in a patch and test it. Here is the result with a basic human house next for comparison. 3]Add some doodads with WMOeditor A house that's fine, but without furniture it's a little empty. We are going to fill it with WMOeditor and 010 editor. This time, open the group file in which you want to add doodads. Do CTRL+F to open the search window. In Type you must have "ASCII String (a)" and write "NBOM" in Value, then click on Find All. You will have a line including what you want that appears in the lower part of the window. Now do CTRL + I to open an insert window and look for the file containing the chunk for upgrading your sub -parts of wmo. If you compare with your original line and it has changed, then it is good. Save it. Repeat for each subpart involved in your wmo. Time to get serious and open WMO editor . At first it can be a little confusing to use because it displays models with a mirror effect. So once your wmo is opened, go to Root File to find the geosets that compose it. Click Edit to see their options, check "Has Doodads". Close the window and repeat on the other remaining. We can finally start placing those famous doodads. Now go to Doodad, in the bottom box is the doodadset that indicates how many m2 it has in total. Most houses have several doodadsets, but I have not figured out how to add a second, I'm working on it. Click on the [...] to open a window with a list of m2 similar to WoW Model Viewer. Once your selected an object, double-click on it, the window will then leave and you can place it in your wmo. Please note that the window does not close so far, it just comes up behind the first one. To navigate through the window of your building, the controls are the same as Noggit. Once you have decided where you want to place your object, place your cursor there and made CTRL + V to paste it. Here are the commands that allow you to move your objects as you like. Once you're done, save your work in File>Save. Your wmo completed will be saved in the WMO editor folder, in world. You just have to go in game to see the result. Congratulations, you are with a furnished house! 4]Add a doodadset 4) When you are finished with first doodadset you can add another one. For this you need only to edit the root_wmo file. So agan load it in 010 Editor. Go to MOHD and change the nSets to "2". Then ctrl+F NDOM and insert "this" just like we did earlier. But now it's time for some differences: when we added a new row for MODS chunk we need to change the name of our second doodadset like this: Then you need to change the index of first doodad used in this set to summ number of doodads used in previous sets(if you already have 2 doodadsets and wanted to add third you set this value to number of doodasds in first set + number of doodads in second. etc etc). In my case I've added only second set when first have only 9 doodads used. So I've change the "first doodad index(FDI)" to "9": That's it. You can save the file. Pack to mpq and load in WMOEditor. 5]Additional Informations 1) Use textures with transparency In your buildings, you may be asked to use textures with transparency as a grid for example. On blender, you can see the transparency with the rendered mode or other stuff like that, and the material clearly indicates that there is transparency. In game you will have opaque texture like all other. To set the transparency, we have to open the wmo in 010 editor and look in the MOMT chunk. In it, find your texture, at the line " UINT32 blendMode " you will see that the value is 0, it corresponds to the opaque mode, just put 1 in place in order to transparent mode. It's as simple as that. Save everything and voila. 2) Collisions Normally Mirror Machine manages well enough collisions each surface must have. If some places are little bullshit on collisions or you want to make collisions as Blizzard putting invisible walls to avoid falling into a ditch, or just block passages, well I'll tell you how. Here is an example of collisions that Blizzard has done in Gnomeregan, most of the time there are "boxes" goshawks some pipes or rounded elements such as barrels and also invisible walls to avoid falling in some holes. Collisions are in fact a double of the model but with the same number or sometimes fewer polygons and fully transparent. To do the same, you just have to use an invisible texture on your geoset. 3) Adding lights a) Manually with hex editor. You can look at the video made by PhilipTNG, it's pretty well explained. http://modcraft.superparanoid.de/viewtopic.php?f=20&t=927 Maybe later I'll add this part in text with images. 4) Coming soon and WIP... I wanted to wait a bit to publish my tutorial and put in more informations, but they need intensive work and research, so I'll put it later by updating this tutorial. What I want to show you: add music in the wmo add footstep noises on the floor (wood, metal,...) add more lights (glowing windows,...) add liquids (water, lava, ...) And here are some WIP screens: 6]Creating or editing WMOs in Blender with plugin For this part, you can see the tuto made by Skarn about the WMO plugin for Blender, very useful and better than MirrorMachine. ___________________________________________________ I hope this has been helpful. Enjoy. (ps: sorry for my bad english if there are strange sentences)
-
 Meta changed their profile photo
 -
A little update for the old model.
-
-
I'll try to find free time to write a guide for this
-
Hi, as I can see you have some issues with HotS models and m2i. I don't have much time for modding this year, but I'll try to help. First, when you use M2mod, you have to take an existing model from the game to use its bones and armature as base to put your own model on it. When you export you model from 3DSmax, choose FBX and not OBJ, so you will keep the weight paint, bones and animation from the HotS model. For exemple with Johanna, you have to open your m2I first, import the FBX of her, rename the vertex groups of her weight paint with the name of the bones from wow model, link and merge the Johanna's geometry to it, delete the original geometry of the wow model you don't want to keep, and export to m2i. You have to keep the same "structure" from the original wow model, if you delete bones or something like this, it will break it. To have texture on the model, look at it with Hex editor, you can modifiy the texture path if it's hardcoded and has enough letters, if not just change the flag to CreatureSkin (11) and make the skin in DBCs. If the model is invisible, try to use converter. Sometimes the model's version makes it invisible if it's from WoD/Legion for exemple. PS: sorry I forgot to mention in my tutorial that FBX exportation was better than OBJ.
-
Thanks, I've not thought about spam bots.
-
Rename the extension in *.rar instead of *zip, it's what I did and it worked after that.
-
Oh, yeah, I forgot to mention that the file needs 7zip to be extracted, only 7zip.
-
Hello people I don't really know how to announce this because it's not an usual situation, so I'll do it simple. Days ago, I was contacted by Zim4ik's brother, he told me that Zim was dead. He did it only now because he accidentally opened his email with mails from Modcraft few days ago and I was the last guy who talked with him. So, here's the messages. Zim4ik's brother: I asked if I should tell this to the community too, and what happened. It's very sad to die in this kind of circumstances. So, as he asked, I continue to discuss on his own email. I told him he can send us his work so it will not be done in vain because he worked for this community. I'm not in the same country as him, so it's not easy to find the time to use teamviewer, I'm not a pro too and I don't know which file can be useful for the community if it's not models (Trinitycore, sql, etc...). So he uploaded the files. The files are hosted on Mega, but he forgot to give me the key to decrypt the link. So, that's it. You can download the pack too, it contains his work on retro-porting HD races to 3.3.5 (the m2i are for older M2mod release, but you can convert his modified m2's with newer version). There's also a patch with custom races like Tuskarrs, Taunkas, etc...) and DBCs to make it work. You are free to continue his work if you want. https://mega.nz/#!VQZWSLhL Key : !rThTc2gf21r55mWoto9WwTgJdaQtDS2N-qXNfV_fFP0 Edit: you can extract the file only with 7zip, not winrar or default windows extraction. You can contact his brother if you want to tell him something about that, I don't think he'll be angry. y*********[email protected] [Email Address Remove to Prevent Spam] (Send me a message if you want it to contact him) Gnomically, Meta.
-
Hello, it's me again with a new issue in M2modRedux. I converted a model to m2i and tried to convert it back to m2, but it doesn't work, even without any modification. Tried with multiple versions of the model and M2mod, I always have the same error for each version. Here's my error: Gnomicaly, Meta.
-
How does it work with Wow Model Viewer ? Can it load the custom models from the folders or it needs casc format only ?
-
@Skarn With the Sabaton version I can understand the refrain