
Inico
-
Posts
21 -
Joined
-
Last visited
Content Type
Profiles
Forums
Servers
Downloads
Gallery
Everything posted by Inico
-
TUTORIAL: BLEND MODE OVERRIDES (I'll try to update this tutorial often with new information) In this tutorial I'll show you how the blend mode overrides work in WotLK (or "vertex alpha" as some people mistakenly call it). This system was implemented in the Burning Crusade, but Blizzard has been using it heavily since Wrath of the Lich King. Basically, the game loads two textures for a single texture unit, allowing you to use one of them as an opacity mask to avoid hard cuts. You can make many awesome effects: (It's just a few planes with texture animation and a texture mask on top) It's an advanced model edit. We don't have the right tools and the documentation is almost non-existent. However the result is really satisfying and it's actually possible to do it by hand. Before starting, keep in mind that this system is not well documented. Most programs like Blender or PyModelEditor can break your model if you load them after applying this effect, so, leave the blend mode override for the last. TOOLS -PyModelEditor. -010editor + wow templates. -IMPORTANT: "Second UV channel creator" script. -My test model. THE TUTORIAL 1) Open your model with PyModelEditor: -Open your model in PyModelEditor and create a texture animation. You can follow my TUTORIAL. -Then, add the texture with the mask. In this case, we will use this one: World\TexAnimPlaneTest\BlendEffect.blp (included with my test model). It is VERY IMPORTANT that the texture with the mask is bellow the main texture. You can now save your model and close PyModelEditor. 2) Open your model with 010editor: -The main problem when trying to apply this effect is that your model must have a second UV channel. I made a script that clones the first UV channel into the second slot. Open your model in 010editor and run my "Second UV channel creator" script. If your model has blend mode overrides activated but doesn't have a second UV channel it will look invisible in-game. Note: make sure you are working on "OVR" mode before running the script. You can change it by using the Insert Key or by clicking INS/OVR in the status bar. -Change the renderflag that your model will use to additive alpha (4) or blend (2). Otherwise, the new blending mode won't work (will look black). 3) Now is when this starts to get complicated: -Go to the header and change the GLOBALFLAGS to 8. When you do this, the blend mode override activates. -Run the m2 template again and you should get an error message. Load the model anyway. Go to the bottom and a new block called "struct new_mapping" should appear: Go to the bottom of your file and write a line of "0". Copy the position of the line. In my case it's "1312". In "nAltMapping" write "2". In "ofsAltMapping" write the position of the line you just wrote: Run the m2 template once again and it should load correctly. Two new lines will appear under ofsAltMapping. Write "1" in the first one and "4" in the second: 4) Go to TexAnimLookup. There should be two TexAnimLookup: -1 and 0. The first one controls if the first texture moves. Replace -1 with 0 to make it animated. The second line controls if the mask texture moves. Replace 0 with -1: 5) Open your model SKIN with 010editor: -Go to texunits and change the D4 of the mesh with blend mode override to 2. This will force the game to load 2 textures for that tex unit. It will load the one referenced in the skin and the one bellow in the M2 list (texlookuptable). -In "texanimid" there should be a 0. You can now test the model in-game. It should look like this: As you can see, it uses the opacity of the second texture and it doesn't affect its texture animation. Without the blend mode override system it's impossible to make something like this. Feel free to play with the texture and create new effects. Remember that the mask texture must have an alpha channel or your model will look black. If you want to download the mask texture I used for THIS image, you can download it HERE. TL;DR VIDEO EXPLANATION If the GlobalFlag of your model is 8, the game triggers blend mode override for your model. You activate the blend mode override in the .skin file, by changing the D4 of your desired texunit to "2". When the GlobalFlag is 8, the way your M2 works changes completly. The order of your textures becomes relevant. The order of your textures will start to be read in pairs. Here is an example: Also, the order of "TexAnimLookup" should mirror the order of "TexLookupTable". The ID 0 of "TexAnimLookup" controls the texture animation of the texture with ID 0 in "TexLookupTable". I know it's kind of complicated, but play with it for a while and you will find out how it works. The values you write in nAltMapping (1; 4) are the renderflags of the blending mode. It means that the base texture will be applied as additive alpha (4) over the opacity map (1). If you think it looks too bright, change it to 1,1. MODELS WITHOUT HEADER SPACE Some models don't have space in their headers for the blend mode overrides extra block, therefore it overrides the model name data. What you can do in this case is opening the model in PyModelEditor and then saving it. Every time PyModelEditor saves a model it remakes the header from scratch and adds some free space for the extra header. However, the model name block is not necessary. You can just override it with the "new_mapping" block if needed and it won't cause damage to the model itself. UV CHANNELS If you want to create a custom second UV channel, download THIS SCRIPT I made. As you can see, it copies the UV channel 1 of a second model to the UV channel 2 of your first model: The idea is simple: make your model. Then clone it, modify its UV map in Blender and copy it to the second UV channel of the original model. This second uv channel method is used in many models, such as the fire coming out of Agrammar's eyes. You can map geometry into existing or smaller textures without having to create a new one. Here is an in-game example of a model with two different uv channels: After the script, the second uv channel is smaller and centered around the heart shape, but the first one along with its texture remains intact. The result is a bigger mask, leaving the original texture and UV untouched. IN CATA, MOP, WOD AND LEGION If you want to use this system in Cataclysm or Mists of Pandaria, the process is quite the same. Some steps are different. (Thanks to Soldan for giving me some information) -Instead of changing the GLOBALFLAGS to "8", you should put "128" ( or "0" if your model doesn't cast shadows). The "struct new_mapping" block won't appear, and it's not necessary, so you can skip the Step 3 completely. -Additionally open the .skin file, go to the texunit with blend mode overrides and add "16401" to the "order" field (aka "shader"). That number replaces the "struct new_mapping" block. If your model looks too dark, put "16404" instead, and it will look brighter.
-
TEXTURE ANIMATION: THE TUTORIAL Hello everyone. In this tutorial I will explain how texture animations work. It's based in WotLK but it's exactly the same for Cata and beyond. We will add a basic texture animation to this test model: (you can download it in the Tools section) This method is quite useful to simulate waterfalls, energy beams, fire and much more. If you want to add an advanced opacity mask, check my other tutorial. TOOLS -PyModelEditor. -My test model. Take in mind that it can be done in 010editor as well, but it's a little more complex. Once you know how texture animations work with PyModelEditor, feel free to explore it a little further creating multiple animation layers with different renderflags or adding them with 010editor. THE TUTORIAL Run PyModelEditor and open the test model (TexAnimPlaneTest.m2). 1- Go to GlobalSequences. 2- Write "1500" (without the quotation marks) and click on "OK". This is the ammount of time our animation will take. 1500 milliseconds is 1,5 seconds. The more milliseconds, the slower the animation will be. 3- Go to Edit UV Animations. 4- Click on "Add" to create a new texture animation. 5- Once the new texture animation is created, go to "Edit Translation". 6- A new window will open. Go to "Add AnimSub". 7- Change the Interpolation to "Linear". 8- Apply the global sequence you just created. 9- Paste this line: 0:{ 0.0 , 0.0 , 0.0 } 1500:{ 0.0 , 1.0 , 0.0 } Now, click on Ok on all the windows you have open to apply the changes. 10- Go to Edit Materials. 11- Select the material of the mesh you want to add the texture animation (in this case, the test model only has one) and assign the texture animation you just created. You can now save your model. If you test the model in-game, you will notice that the texture animation works fine, but there is some kind of dragging bug and it doesn't loop correctly: This happens when the texture is not tiled. To tile the texture, open the model with PyModelEditor, go to Edit Textures and check both "X-Wrap" and "Y-Wrap": This should fix the problem! (you can also do it in 010editor by changing the TextureFlag to "3"). TL;DR VIDEO UNDERSTANDING THE ANIMATION SEQUENCE Now that you managed to make your own texture animation, you may be wondering how to reverse the animation, or move it sidewards instead of upwards. The key is in the animation line we added in PyModelEditor: As you can see, each line has 4 segments: time frame, horizontal movement, vertical movement and an unused stack of data that we will never touch. In frame 0, your texture stays on its default pose (0, 0, 0), but in frame 1500 it moves vertically (0, 1, 0) and goes back to where it started (it loops). "1.0" is the ammount of times the texture loops. If you change it to "0.5", the texture will start moving but will return to its defult state when it has traveled half the texture. If you replace "1.0" with "-1.0", the texture will go downwards instead of upwards. So, basically, "1500:{ 0.0 , 1.0 , 0.0 }" means that in 1.5 seconds your texture will loop vertically once. Another example: "3000:{ 0.0 , -1.0 , 0.0 }" means that in 3 seconds the texture will loop vertically once (but downwards). If you put "1.0" in the horizontal segment instead of the vertical segment, you'll see something like this: And if you want it to move to the corners, you simply need to put "1.0" (or -1.0 if you want it to go to the opposite direction) in both the horizontal and the vertical segment: CONCLUSION Texture animation is quite easy once you know how the numbers work. You just need some practice and experimentation to master it. If your model has many .skin files, PyModelEditor won't manage the texture animations so well. The best tool for those cases is 010editor. I recommend you to start with small models first. This tutorial was requested many times. Hope you find it useful.
-
Hello everyone! In this tutorial we will learn how to avoid losing geosets when porting Warlords of Draenor/Legion HD character models, although it's very useful for any other model. It's not a "completely noob" guide, so you must have some 3D modeling knowledge before starting. This tutorial is ONLY for Blender 2.7 and beyond (The decimate modifier is included in older versions but it destroys the UVs). Lets begin! Triangle limit explanation World of Warcraft models have a triangle limit of 21845. In Mists of Pandaria Blizzard managed to bypass this limit by creating geometry levels. If you try to retro-port a model that goes over the polygon limit you get something like this: The extra geometry is rendered as a mess of triangles in modelviewer and you will notice that a lot of geosets are missing in-game. Most people just delete or don't even try to fix them saying that it's impossible to make all geosets work in older versions of the game, but there is a trick to make it happen: reducing the polygon count. What's decimate? Decimate is a Blender modifier that allows you to reduce the polygon count of a mesh with minimal shape changes. It used to work terribly in older releases but was redesigned in Blender 2.7 and now it's "magical". We are going decimate some parts of the HD character models to decrease their polygon count and make them fully work in WOTLK (and Cataclysm). TOOLS -Blender 2.73 (or higer) -M2MOD Redux 4.6.1 THE TUTORIAL STEP 1 - DELETE VERSION INCOMPATIBLE GEOSETS There are some geosets that won't show up in older versions and should be deleted to prevent a "polygon overload": -Bare feet (All draenor HD character models) -Cloaks from Mesh ID 7 to 10 -Belts with Mesh ID 3 (Pandaren Only) -Wristband with Mesh ID 4 (Pandaren Only) -Tabard2 (Pandaren Female Only) STEP 2 - DECIMATING Once you deleted all unnecessary geometry we are going to start with the polygon reduction process. Don't worry! It's super easy! On the upper right corner of Blender you will find some information about the model. We'll be looking at TRIS. That's the current triangle count. As you can see my model has 27060 triangles. Previously I said that WoW's limit is 21845, so some of its geosets will broke after conversion. To make it work properly we must get rid of some triangles until we reach 21845 tris or less. I prefer to only decimate hair geosets. Sometimes you can't tell the difference between the normal and the low poly version because the texture does almost all the work as you can see in the picture: It almost look the same, doesn't it? Ok, to the actual process: -Select the geoset you want to edit and go to Edit Mode. If nothing is selected, select all (shortcut: letter A). -Go to the panel on the left and click on the "Remove doubles" Button (It's not always necessary, go to the TIPS AND CONCLUSION section for more info). This option welds all the floating vertices together (we do this to avoid holes in the geometry). -Now toggle object mode and go to the modifiers tab (on the panel on the right). -1° Click on "ADD MODIFIER" and choose DECIMATE. -2° Make sure the "Collapse" button is highlighted. -3° Click on ratio, write 0.5 and press ENTER. -4° Click on APPLY. DONE! Now this geoset traingle count has decreased by half. Repeat with other hair geosets until your model reaches 21845 tris or less. Then export and convert to M2. TIPS AND CONCLUSION Sometimes when I applied the Decimate modifier I found holes in the geometry. That happens because some vertices are not welded. The "remove doubles" option welds all vertices that are close together and rule out the possibility of finding holes on your geometry after decimating BUT is a little risky because you don't have total control over the geometry and it can mess up certain small parts of the uv mapping. If you used it and the final result looks good, awesome. If not just undo your changes, skip it, apply the decimate modifier and weld the vertices by hand. Personally I recommend you to always avoid the Remove Doubles option and merge the floating vertices by hand to obtain a better result. Handwork takes some time but in this case is the best choice! However i want to clarify that this process is not 100% automatic, in most cases you will have to deal with holes and misplaced vertices, but it's nothing that can't be repaired in a few minutes VIDEO (AKA "TOO LONG, DIDN'T READ") If you have any question let me know. Thanks for reading! Have fun!
-
Hello Everyone. Many people have been asking me how I ripped the female troll from classic WoW alpha. Here is the tutorial. If done well, only takes 5 minutes. With this method you will be able to extract only the geometry. It doesn't work for particles or animations. Tested in WoW alpha version 0.5.3.3368. Tools -MPQ Editor (or any other MPQ reader) -010 Editor -My T-pose script -Ninja Ripper (For this tutorial I used version 1.5.2) -3D Studio Max (For this tutorial I used version 2012) Step One - T-posing First of all, you need to extract the model you want to rip with MPQ editor. Wow Alpha models are in MDX format, quite similar to Warcraft 3. Open the model in 010 editor and run my T-pose script. This script leaves the model with just 1 animation (if you remove them all, the game crashes), and changes its animation interval to 0. This will set the model to its default unanimated state, making it symmetrical and easier to animate. Once your model is T-posed, you have to put it back in-game. WoW alpha has local directory loading allowed, so it's quite easy. Just open the "Data" folder inside your WoW alpha client, make new folders following the original model's path and put the mdx inside of them. It's a classic model swap. You can test the model in-game if you want. Step Two - Ripping Now that the model is unanimated and T-posed we can proceed to rip it. Open your server. Set the starting zone to Eastern Kingdoms. If the game is opened, close it. Unzip Ninja Ripper. Go to the folder called "x86" and open NinjaRipper.exe. In "EXE" select "WowClient.exe" inside your game folder. In ARG type: -uptodate -windowed It should look like this: Click "RUN". The game should open. Log-in (you have to be morphed into the model you want to rip) and open your command line (pressing "~" or "Ñ"). Teleport to the following coordinates: worldport 0 -9999 -9999 22 (this code is for the Abyss2 emulator, it may be different in other emulators) Why do we teleport to these coordinates? Because Ninja Ripper extracts every single model on your screen, and we need an empty environment to avoid a model overload. Now, hide your interface with "Alt + z" (or the program also rips the interface) and press F10 to start ripping. The screen will freeze for a few seconds. When the game returns back to normal, close it. Your model has been extracted. Now you can close both the server and the game. Step Three - Importing There will be a new folder called "_NinjaRipper" inside your WoW alpha folder. Here you can find the ripped model. Every geoset is split into a .rip file. The textures are in .dds format. Now, open 3D Studio Max. Go to "Maxscript-> Run Script" and choose the file "ninja_ripper_import_1.3.ms" inside your Ninja Ripper folder. A new window will open: -Check the "group" button. -Go to input dir. Select the folder containing the ripped model. -In "RIP File Nums" write: "0000-000X". X is the ammount of .rip files inside your folder (starting with 0). i.e. If you have 6 files, it's "0000-0005". -Scale: 1. -Rotate X=0. Rotate Y=0. Rotate Z=270 It should look like this: Now, click IMPORT. As you can see, the program ripped everything in the screen, even the sky, but since we teleported to an empty area, just have to delete the skybox. And that's it! Now you can export the model to Blender or MDLVIS and animate it. Notes -Always open WoW alpha in windowed mode. Otherwise it can freeze your computer. -Don't rotate your model in-game before ripping. Even without animations the game can distort the geometry (for example, the hip bones automatically stretch the mesh when you turn left or right). -If you want to rip a full character model, play with the DBCs to show all geosets at once, or turn it into a creature model. -If you don't want to use 3D Studio Max, there is an import script for Milkshape 3D, but the links on the official webpage are down.
-
In this tutorial we will learn how the so called wotLK procedural water works, and how to activate it. This water was added to the game files in patch 3.0 for internal testing only, so keep in mind that it's not perfect. It's called procedural but actually isn't, because nothing is created algorithmically, it's just a group of textures that interact with each other and give a nice visual effect. There are some patches available online with this water activated, but most of them have errors or look bad (based on my own judgment). We will also learn how to improve it and customize it. Tools -MPQ Editor (or any other MPQ reader) -Any DBC to CSV converter, such as Wow Parser -Notepad -Any BLP converter -Photoshop (or any other image editor) Step One - Editing the DBCs Open MPQ editor and extract the file "DBFilesClient\Liquidtype.dbc". Convert this file to CSV (you can't edit it directly with a DBC editor for some reason) and open it with notepad. Each line corresponds to a liquid type. The one with ID 100 is the procedural water. We will do a line swap. You have to delete these entries: 1 (Water), 2 (Ocean), 5 (Slow Water), 6 (Slow Ocean), 9 (Fast Water), 10 (Fast Ocean). Now copy the line with the procedural water and give it the same name and ID of the entries you deleted. http://i.imgur.com/cC87I59.jpg You will notice that there are 2 kinds of water: simple water and ocean water. If the entry has "Water" in its name, replace the "1" in the 4th column with "0". It should look like this: http://i.imgur.com/a484Hvl.jpg Also, if the entry has "Water" in its name, go to column 20 and replace "proceduralOceanDepthTex" with "proceduralRiverDepthTex". The game uses a special illumination for the ocean, so this step is important or your water could look weird. Technically we are done, but there is one last thing we can do: Go to the column 21 (it's the last texture in the line) and replace "XTextures\ocean\ocean_h.%d.blp" with this transparent texture: "World\GENERIC\PASSIVEDOODADS\ParticleEmitters\DemonGlow04.blp". Doing so will remove this pointless reflection: It's quite annoying and unnatural because it goes against the position of the sun. It's better to remove it, but totally optional. Now you can save your CSV and convert it back to DBC. Note: you can also swap the wintergrasp and hyjal water if you want. Just check the spell id in column 6. Step Two - Extracting the missing textures As you may already noticed, the procedural water uses a few textures that don't exist in-game. Blizzard tested this new water internally, that's why they never added the textures to the WotLK client, but they are present in updated client versions. You can download the missing textures HERE. If you want to extract them by hand, just open an updated wow client (4.x or beyond) and extract the following textures: XTextures\ocean\basicReflectionMap.blp XTextures\ocean\basicWaterHeightTex_X.blp ("X" is a number between 1 and 32, you must extract them all) Rename the folder called "ocean" to "procWater" and it's done. You should have 33 textures, something like this: XTextures\procWater\basicReflectionMap.blp XTextures\procWater\basicWaterHeightTex_1.blp XTextures\procWater\basicWaterHeightTex_2.blp XTextures\procWater\basicWaterHeightTex_3.blp etc. Note: the reflection texture has a unique compression and most blp converters can't read it. If you are having trouble trying to convert this image, install BLPView, preview the texture in the Windows preview pane, take a screenthot and paste it in a new document (768x128). Step Three - Tweaking the Textures Reflecting Texture Now you can test the water in-game. If you did everything right, it should be working correctly. BUT it can look much better. Before starting, it's important that you understand how the reflection texture works. The game only reads the texture if it's 768x128 (width x height). Bigger or smaller images won't work. The texture is divided into 3 sections: The 1st section is a panoramic photo, the reflection itself. The texture bends to form a ring around your character (from another point of view, it wraps around a cylinder). Then, the 2nd section of the texture fills the gap at the center of the ring. The 3rd section overlays all layers. The farther from the center, the more it becomes distorted. Also, it creates some small waves. Now that we know how it works, let's analyze this image: This is how the procedural water looks with the default texture. Yes, it looks like radioactive waste. We have a reflective texture with a lot of green, and the 3rd section of the texture overlays even more green, messing the original color of the water (it should be blue, not yellow). -The first thing we must do is opening the texture with photoshop and removing the sun. Why? Because the water is always reflecting the sun, even at night, and it doesn't look good. -Then, we must desaturate it. If the image is in black and white it doesn't mess the original color of the water (if the water is blue and your reflective texture is red, you will get purple water). You should avoid using color. -We can also darken it a little bit and give some yellow to the third section of the texture. This will give us subtle golden reflections. Now it looks much better. In case you want to remove the 3rd section because you don't like the overlay reflection or waves, just fill it with black. You can even make a lot of new water ids, each one for a different zone, with a different reflective texture (you just need to change the texture name in the DBC), or you can make new liquids, as this "mana water": The "wave effect" You will notice that after some time the water starts doing some kind of fractal movement, creating a weird wave effect. It can look good in the ocean, but a little out of place in ponds or lakes. This is caused by texture tiling. In order to repeat the reflective texture, the game tiles it. Since the texture has different contrast levels, it makes an optical illusion similar to a succession of waves: This effect is hardcoded into the shader (even filling all collumns with 0 in Liquidtype.dbc won't change it), however you can make it less noticeable by using a dark texture with homogeneous contrast, like THIS ONE. You will see less reflections, but the "wave effect" is almost gone: You can use the default texture for the ocean and the one with less reflections for small bodies of water, but it's a matter of taste. Ripples The ripples are created by the sequence of 32 textures named "BASICWATERHEIGHTTEX". They distort the reflection texture. Each one of them is a frame. Basically these textures are normal maps simulating movement and depth. You can also try to apply other textures, but I won't get deeper into that, because I think it looks good with the default sequence, and it's quite difficult to make a new animated normal map. Player wakes and splashes If you want to update the old wake and splash textures, you have to replace the following files: XTEXTURES\Splash\splash.blp XTEXTURES\Splash\wake.blp Here are some textures I made that match procedural water way better than the default ones: (You can download them HERE) Water brightness Procedural water is brighter than classical water. This is more noticeable at night (specially in places like Theramore or Booty Bay). This happens because the texture is not affected by the diffuse and ambient lighting (the same occurs with the default water, but since it has transparency and the material beneath is indeed affected by lighting, you don't notice this effect). There are a few things you can do to counter this issue: -Darken the reflection texture. -Decreasing the water color lightness by half in the DBCs (LightIntband.dbc, last 4 IDs, more information HERE). Conclusion That's all the basic information you need to know about this "procedural" water. You can also download a few custom textures I made HERE, so you can see how different the water looks with different environments. Feel free to make your own textures and explore this topic even further. Also, remember that this water is some kind of alpha testing phase for the liquid system released with Cataclysm, so you can find some artifacts like random lines in the ocean. My goal with this tutorial is to stop people from asking for procedural water mods, it's fairly simple to do it yourself. If you have more information to contribute, please send me a private message and I will add it to the tutorial. Thank you. Have fun!
-
 Those extra geosets can be hidden in CreatureDisplayInfo.dbc. Check this (creatureGeosetData). You can't remove geosets using this program, but there are some tricks to make them invisible. You can create a transparency with value "0:0" and apply it to those geosets, that will hide them in-game. Or you can add a black texture (like 'Spells\Black64.blp') with an additive renderflag and that will make the horns invisible as well (dark colors with additive blending will disappear).
 -
Version 1.0.0
295 downloads
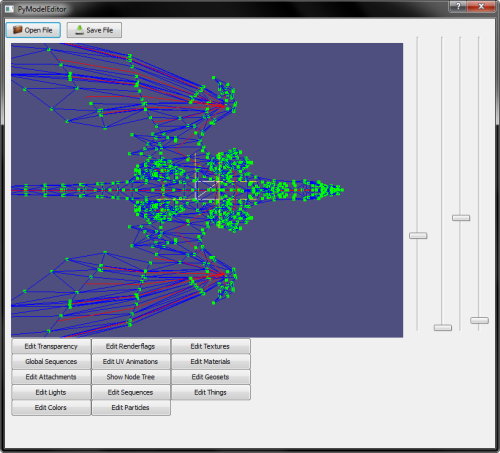
An old M2 editor for Wrath of the Lich King by Tigurius. This is one of the latest versions from july 2011. Allows you to edit cameras, bones, particles, attachments, textures and more. Includes a model resizer script (PYM2 → Resizer.py). Some models with .anim files will crash the game if you edit them using this program. External link. -
 Clone the flying carpet spell. Or Spell.dbc column 132 -> SpellVisual.dbc column 5 -> SpellVisualKit.dbc column 3 = animation played
 -
 It's in the post details.
 -
Version 1.0.0
132 downloads
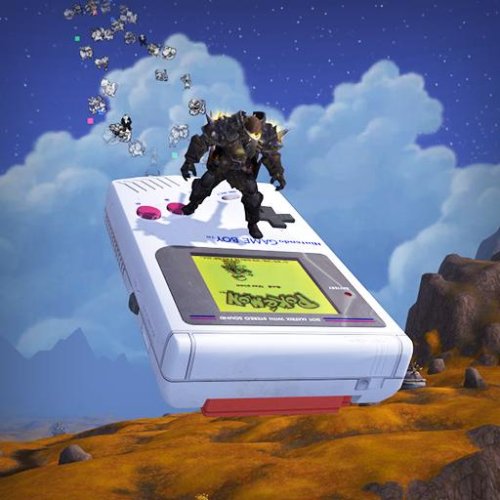
A Game Boy console from the 90s with an animated screen. For Wrath of the Lich King (264), Mop, Cata and Wod (272). Includes 9 cases and 13 cartridges. First DBC texture column: case Second DBC texture column: cartridge, particles and screen External link: Mediafire Password: by inico -
Version 1.0.0
96 downloads
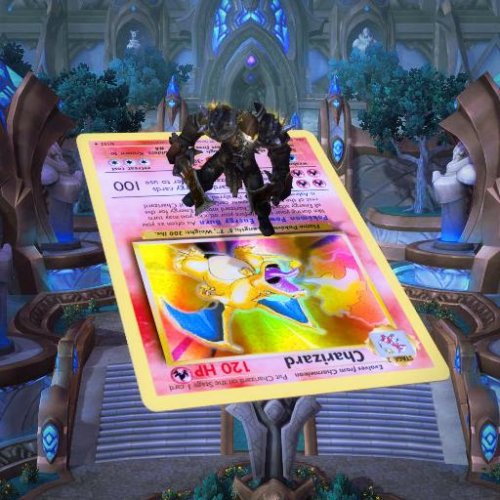
For Wrath of the Lich King (264), Mop, Cata and Wod (272). Includes 11 cards. First DBC texture column: foil texture Second DBC texture column: card texture External link: Mediafire Password: by inico -
Version 1.0.0
79 downloads
This template for 010 editor allows you to modify PHYS files from Mists of Pandaria and Warlords of Draenor. DOWNLOAD Some notes and technical information: How to load a PHYS file in-game Change your model globalflags to 32 (or 160 if your model casts shadows as well): The bones with physics must have flag 1024: Bone coordinates Bones with physics will take their position coordinates from the phys file and ignore the position given in the m2. Position is set in the WELJ, SHOJ or SPHJ chunks. Bone hierarchy Bones with physics will not be affected by the rotation, scaling and translation of the parent bones unless they are added as an attachment. As you can see in the image above, the gourds with physics are not affected by the m2 animation and will only move if their coordinate in the world changes. This is why Blizzard makes separate m2 files for parts with physics. Exampe: creature/fishmount/fishmount.m2 (base model without physics) creature/fishmount/fishmount_wiskersleft.m2 (left wisker with physics) creature/fishmount/fishmount_wiskersright.m2 (right wisker with physics) The wiskers from the fish mount are in different m2 files, attached server-side as a vehicle accessory. You can also add them as spells or items. If the whiskers were part of the base model, they will just be floating next to the head, since they would not be affected by the parent bone movement. It's not necessary to separate meshes with physics if your model is static (i.e. helmets, weapons, shoulder pads, etc.). However you can add physics to a bone, and animate all the bones connected to it. (Since 7.1 models with physics don't have to be separated - See http://www.wowhead.com/item=143829 as an example) Difference between MoP and WoD The Phys file structure is the same for MoP and WoD. However, the only thing I noticed is that in MoP physics are more sensitive and the shapes feel lighter. -
You can reduce the polygon count by decimating. Here's a tutorial. I think you can bypass the limit by playing with some triangle id's but for now the easier method is decimating.
-

WotLK to Cata/MoP/WoD Model Converter
Inico commented on Inico's file in 010 Editor Scripts and Templates
To convert a model from WoD to Legion you just need to add 3 chunks to the m2: MD21 (contains the size of the M2 in bytes), SFID (includes the file id of the m2 .skin files) and AFID (includes the file id of the m2 .anim files). But you can't do that with a 010 editor script since SFID and AFID point to specific file ids, and they are unique to the model. So you have to do it by hand or copy them from the model you are swapping. The script would only generate the MD21 chunk, since it's quite easy to make. In previous versions the game just loads all the files inside your model folder, but in Legion you have to tell the game which files to load for each M2, and that's quite annoying. -
Version v1
427 downloads
This script for 010editor converts Wrath of the Lich King .M2 and .SKIN files to Cataclysm, Mists of Pandaria and Warlords of Draenor. Supports: -Cameras. -Particles. -Animation flags. -Projected shadows. -Transparency flags. -Blend mode overrides. Also includes: -Batch file converter. -Shadow remover script. -Sequence flag remover script. -Skin template for 010editor with shadow batches added. DOWNLOAD Some notes and technical information: -make sure you are working on "OVR" mode before running the script. Projected shadows As you may know, projected shadows are stored inside the .skin file since Cataclysm. This script creates shadows for all texture units, including those with additive materials. If you want to remove the shadows from a specific geoset, just open the skin file with 010editor, run the skin template included inside the tools folder and delete the texture batch corresponing to that mesh. If you want to remove ALL shadows from a model, just use the "Cataclysm Shadow Remover" included in the tools folder (it's useful for stuff like fire or lights, that are not supposed to cast a shadow). As you can see, the glow, which is a billboarded square with addivite renderflag, is casting a shadow and the game can't handle shadows with additive materials. To remove it I selected its shadow batch, deleted it and reduced the shadow batch count by 1 in 010editor. More info in this video: Flying mount animations In WotLK, mounts use swimming animations for flying. Since Cataclysm, however, there are separate ids for swimming and flying since flying mounts can now be used as ground mounts and therefore swim. But, if a mount model doesn't have fly animations, the game will use its swimming animations. That's why this script doesn't duplicate them. It's not necessary. WotLK flying mounts should still work perfectly in Cata, MoP and WoD. Reflections This script doesn't convert reflections since there is no exact way to know when a texture unit is used for a reflection, glow, etc. So you must do it by hand. Just open your skin file, convert it to Cata+, go to the texunit with the reflection and change its shader to "144". Here is an example using "Creature\Murloc\Murloc00.skin": You can change the "texunit" and "texunit2" fields to "0" but it's optional since those fields are unused since Cataclysm, but just in case. Animation sequence flags Sequence flags are 128 digits bigger since Cataclysm. Without these flags some animation frames loop when they shouldn't and sequences don't blend correctly. This script fixes that problem and gives smoothness to the animations. If you want to remove the extra flags for some reason, just run the "Cataclysm Sequence Flag Remover" script included in the tools folder -
-
149 downloads
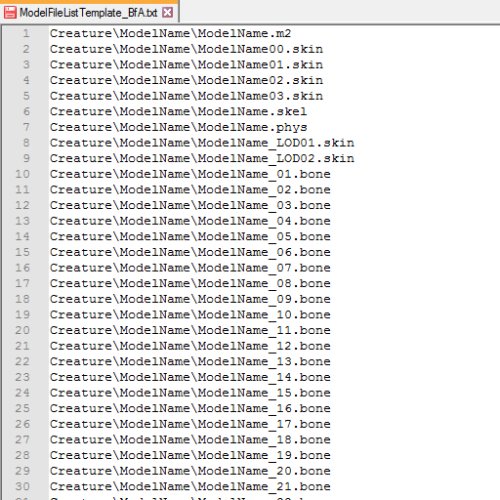
I use this small listfile to quickly find all the elements of a model when a new build or expansion comes out and there are no listfiles available. Just open the file with notepad and replace "Creature\ModelName\ModelName" with your model path (Edit-> Replace...), for example "character\zandalaritroll\male\zandalaritrollmale" or "creature\vulperafemalepirate\vulperafemalepirate". Then use it as your listfile in Casc Explorer. Includes .anim, .skel, .bone and .phys. Of course, it doesn't look for textures. This is quite useful for me because most released lists lack some .anim files. -
If the model already had that effect in Legion it means that it has a second uv channel. Therefore, you don't have to use that scrtipt. Just change the globalflag, play with the texunit order and appy the d4 field to the skin file. Or you can use Adspartan's converter. It can convert blend mode overrides from Legion to WotLK (doesn't work on all models but it's something).
-
That's not a particle. It's mesh with blend mode overrides. You have to manually fix it.
-
Just replaced all spiderwebs inside the wmo and it worked without texture bugs: (using a Cataclysm client) If you are doing it without the template remember to fill the extra space with 0s or the data will be overwritten. And use the most updated file inside your patches. I used one from an old mpq and the game read it as if it was filled with water.
-
I mean, you can replace the path inside the wmo with an invisible model (like spells\invisible.m2) and that will replace all the models, only for that wmo. Every wmo has a model file list. Each placed object refers to the id on that list. If you replace the model name inside that list, all objects using that id will be replaced automatically. You don't have to make a script. With just replacing the file path inside the wmo all the objects using that path will be replaced. For example, I just replaced "World\Generic\PassiveDoodads\Barrel\BarrelLowpoly.MDX" with "spells\invisible.mdx" inside the wmo and all the barrels disappeared: It took me less than 5 minutes. Since all the barrels in stormwind use model id "49", and I replaced the file path of that id, they were all changed. Just look for the file name of the skeletons, broken chairs and spiderwebs inside Karazhan and replace them with the invisible m2.
-
It's the normal karazhan without spider webs, skeletons and broken chairs. You can easily remove them with 010editor, or replace them with invisible models. Nothing else was changed on that version.
-
 Still never crashed for me. But I released a cleaner version. Check it out.
 -
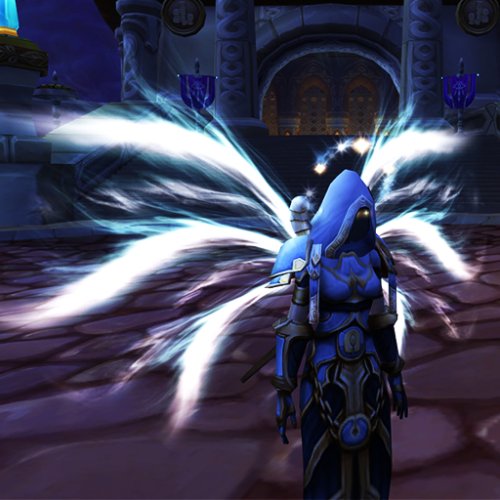 Check this new version. I made the wings from scratch with a different method. It shouldn't crash anymore.