

Skarn
-
Posts
70 -
Joined
-
Last visited
Content Type
Profiles
Forums
Servers
Downloads
Gallery
Everything posted by Skarn
-
IntroductionHello, BNet-Dev. Today I am going to show you guys how to make custom non-animated .m2 models out of .mdx (Warcraft III) models. It is believed that converting models using MDXtoM2 is quite a complicated process but actually it is not that hard. You may ask: "Why do we need to do it if we have OBJtoM2 and it works fine?" Well, the answer is simple. This converter provides you a lot more possibilities than OBJtoM2, such as multiple materials, textures, lights, animations and etc. At first, I will show you how to convert static .m2s but I am going to update this tutorial from time to time when I find out something new. Okay let's go. Tools and resourcesThe full conversion will require quite a big bunch of tools which you have to download. 1) MDXtoM2Converter_lazy - a tool that generates .m2 models out of .mdx files. 2) 3DS Max with MDX export plugin or Milkshape. Well, just something to convert your model to .mdx. If you already have your .mdx object, you don't need it. 3) MDLXConverter - a tool that converts .mdx files into .mdl files which are possible to edit manually via Notepad. 4) MDLVis - .mdx/.mdl editor. 5) War3ModelEditor- a tool that allows you to add some additional sections to .mdx, such as lights, bones etc. 6) BLPLab - for converting your textures to .blp (BLP2) file format which is undesrtandable for WoW. (Warcraft textures are BLP1 and cannot be read by WoW). 7) Collision adder - a tool that generates collision in your m2 file. 8) Resizer.py - a python script that allows you to resize the initial size of your model. 9) PyModelEditor (+Python 2.6 (see PyME thread for details)) to run Resizer.py 10) AddViewDistance for editing the render distance of the model. 11) Sweetscape 010 editor (+ M2 template) - a hex-editor which we are using for fixing bugs in the model. 12) Nullmodel.mdl - .mdl template to make your model understandable for MDLVis. Well, there are plenty of other utilities that can make your model better but they're not essential. The list is quite huge, but don't worry, it won't take that long to get your model into game. Tools which are not linked here are either included into one of the linked packages or can be found in the resource section of Modcraft. Chapter 1. Static models Step 1. Preparing your model1. I won't explain you how to make an .mdx model. There are plenty of tutorials on this theme over the internet. At first, your .mdx file does not contain all the information you need for converting it to .m2. In order to fix it you need to convert your .mdx file into .mdl using MDLXConverter. I will call the result model tree.mdl. 2. When it is done you need to open your model in MDLVis. To make MDLVis open your file you have to make the .mdl structure understandalbe for MDLVis. So, pick up Nullmodel.mdl and tree.mdl model and open them in Notepad++. Find a section called Model in your tree.mdl and add missing strings into this section from Nullmodel.mdl. * tree.mdl } Model "pine" { BlendTime 150, MinimumExtent { -261.362000, -252.451996, -88.562103 }, MaximumExtent { 273.287994, 307.015015, 1465.869995 }, BoundsRadius 796.038025, } * Nullmodel.mdl } Model "Sword_2H_Claymore_A_01" { NumGeosets 1, NumGeosetAnims 1, NumBones 1, BlendTime 150, }* Result Model "pine" { NumGeosets 1, NumGeosetAnims 1, NumBones 1, BlendTime 150, MinimumExtent { -261.362000, -252.451996, -88.562103 }, MaximumExtent { 273.287994, 307.015015, 1465.869995 }, BoundsRadius 796.038025, }3. Now go to the end of both files and replace everything starting from "Bone" till the end of the file using data from Nullmodel.mdl. Now you can open your model in MDLVis. 4. Find string Image and write in the path to your textures. This path will be used in your MPQ files. Step 2. Fixing the model in MDLVis1. For some reason MDXToM2 does not create a usual transparancy chunk in the model. In order to resolve this issue open your model in MDLVis, go to Modules>>Sequences>>Skeleton>>Switch back to Anims. Select both geosets (using check boxes) and mark them as visible. 2. Save your model as .mdx Step 3. Solving possible problems1. In most cases now you can just drag'n'drop your tree.mdx to the converter and it will turn it to m2. Try doing it. If there is a crash open your .mdx in War3ModelEditor, go to Windows>>Node editor>>Right click on the bone>>Add light. Add 4-5 lights and try converting the model with MDXtoM2_lazy. If it does not work, add more lights. Okay, you should get your .m2 model now. [subsection]Step 4. Fixing different converter issues[/subsection] 1. Open Resizer.py with a Notepad. (should be placed inside a PyModelEditor folder). Edit paths to your model, set the size to 0.02. We need to decrease the scale of your model in 50 times. Save the file. 2. Run it by double clicking. If it works you will see a black command promt window for a second. 3. Open your model in the 010 editor. Run a template on the file. 4. Go to "struct TheFloats floats" and divide each value there by 50. For doing this operation faster open "Hex operations" tab, "Divide". Use the following settings: Treat Data As: Float, Operand: 50, Decimal, and press Okay. Now make sure that BoundingBox size is equal to VertexBox size. If not, copy values from bounding box to vertex bpx. Go to "struct sAnimations _Animations" and make sure if the bounding box values are divided by 50 too. 5. Go to "struct RenderFlags _RenderFlags" and set the blendingmode of every geoset to RM_AlphaTesting (1) (for usual models) and set the Render Flag to the one you need. I used double sided on my leaves geoset to make it visible from both sides. You can find the flag explanation on the WoW Dev Wiki. 6. If you added lights with War3ModelEditor you have to go to "uint Lights", "ofsLights" and set the values to 0. Then go to "struct Lights", select the section and press Shift + Delete on the selected bytes. Step 5. Adding collision1. If you need your collision to be 100% of the size of the model, just drag'n'drop your .m2 on CollisionAdder.exe and you're done. If you need to make some parts of the model non-collideable, you need to create another .m2 model which contains only the geometry you need to keep the collision on. You can even add more geometry if you need to make some invisible collsion walls in your model or smth else. For example, for making tree collision for the second model you leave only bark without leaves. Generate the collision for this model and open both ones in the 010 editor. 1. Copy the values from "uint BoundingTriangles", "uint BoundingVertices" and "uint BoundingNormals" to your model. Go to the end of the file and add 5-6 empty strings containing only zeros. Pick up the offset of the last empty string and write it to "uint ofsBoundingTriangles". Copy the entire bounding triangles section to the empty space. Finish the string with zeros. Pick up the offset of the new string and do the same for the rest two sections. You're done. Don't forget to rescale the collision model before doing that using Resizer.py. Chapter 2. Animated modelsI won't explain you how to convert animated models because there already a good tutorial by Phucko1 which should explain you everything you need to know about getting animated models to work. Here it is: http://modcraft.superparanoid.de/viewtopic.php?f=20&t=5536 So, let's think you already have your model converted. However, I am pretty sure that after doing eveything written there most of your model animations will be glitchy. How? This video is the only example I found over the internet, but it looks exactly like this: http://www.youtube.com/watch?v=TUtNSHAPML4 (To the author of this: I just used your video to show how the bug looks like and demonstrate the solution to this problem. I hope you understand it.) Well, as you can see, some models glitch on some parts of animation. If you reduce the speed of changing frames, you will notice that it looks like the animations start going back at some point. So, it is correct in general, but goes in wrong backwards direction instead of looping. Yeah, that's the mistake of MDXtoM2 converter. I don't know what exactly it is caused by, but I know quite a simple solution for this problem. Step 1. Gethering dataGo to model viewer and open your model. Start playing animations in slow motion mode and make a list of the bugged ones. Now, comes the hardest part. By moving the frames switcher in your WMV you change animation frames. Though, not all of these frames are real. Actual KeyFrames are written to M2, and there are not so much of theme. All other hundreds of frames are just interpolation between them. So, you need to slowly move this switcher and stop it when the animation starts behaving weirdly (most likely goes back or loops where it is not supposed to). Pick up this numbers and add them to your list under your animation. Do it for every animation if necessary.Keep in mind that these frames value are always approximate, and later you will need to find the closest keyframe value. Though, it is not hard as it probably seems to you now. By opening your model in MDLvis (mdx/mdl source model, not m2), you can pickup the bone numbers of the bugged animation parts. Just look in WMV what parts of the body swing badly, find the corresponding bone numbers in MDLVis and add them to the list for each bugged animation. Step 2. Fixing bugsNow open your model in pymodeleditor. Show Node Tree>>Pick up the bone You will now see the Bone Editor. Here you have two buttons: Edit Translation and Edit Rotation. One of them, or both can contain bugged data. Fortunately, it is quite easy to track. When you open either of them, you get the animation KeyFrames cords. For fixing animations, you need to pick up the animation ID of the animation you need to fix in the dropdown menu marked as 4 in the screenshot. Now, speaking about the data itself. Let's now see what is wrong here. This the original block of data. 0:{ -32759 , -32317 , -32287 , -7 } 1:{ -32758 , -32317 , -32287 , -7 } 105:{ -31914 , 31173 , -31813 , -64 } 243:{ -29948 , 26571 , -31292 , -749 } 313:{ -29284 , 25977 , -31367 , -932 } 382:{ -28844 , 28110 , -31543 , -595 } 521:{ -29063 , -29421 , -32425 , -385 } 590:{ -29558 , -27700 , 32598 , -555 } 694:{ -30218 , -29822 , 32081 , -240 } 868:{ -31503 , 28143 , 31892 , -365 } 973:{ -32071 , 25472 , 32029 , -839 } 1077:{ -32320 , 26522 , 32240 , -609 } 1251:{ -32396 , 31488 , 32626 , -28 } 1424:{ -32577 , -32500 , -32588 , -3 } 1667:{ -32758 , -32317 , -32287 , -7 } 1668:{ -32759 , -32317 , -32287 , -7 } The number of the each string before ":" is a KeyFrame number. So, the error should be in some numbers close to our previous WMV records. If you look carefully, some values does not follow the common pattern in the middle of the structure. The errors can be only related to negative/positive value differences. You never need to change the numbers. In most cases you mostly need to remove some minuses in from of the first value. But I picked up the hardest example I could find for you here. :twisted: 521:{ -29063 , -29421 , -32425 , -385 } 590:{ -29558 , -27700 , 32598 , -555 } 694:{ -30218 , -29822 , 32081 , -240 }These 3 keyframes look weird for me. And they suprisingly almost exactly match my WMV aniamtion bug records. Let's see why. Keep a look at the second coloumn. These 3 values are negative while everything around them is positive. Here our animation is most likely to go backwards. Let's change them to positive. 0:{ -32759 , -32317 , -32287 , -7 } 1:{ -32758 , -32317 , -32287 , -7 } 105:{ -31914 , 31173 , -31813 , -64 } 243:{ -29948 , 26571 , -31292 , -749 } 313:{ -29284 , 25977 , -31367 , -932 } 382:{ -28844 , 28110 , -31543 , -595 } 521:{ -29063 , 29421 , -32425 , -385 } 590:{ -29558 , 27700 , 32598 , -555 } 694:{ -30218 , 29822 , 32081 , -240 } 868:{ -31503 , 28143 , 31892 , -365 } 973:{ -32071 , 25472 , 32029 , -839 } 1077:{ -32320 , 26522 , 32240 , -609 } 1251:{ -32396 , 31488 , 32626 , -28 } 1424:{ -32577 , -32500 , -32588 , -3 } 1667:{ -32758 , -32317 , -32287 , -7 } 1668:{ -32759 , -32317 , -32287 , -7 }And it works like that for Translations and Rotations. Just save your files more often to avoid erros and make backups. It takes approximately and hour for every model. But I am pretty sure if you do it often, you will get a faster skill. That's all for now. Big thanks to Vel, Malice and other people who helped me and to the authors of all these tools I used here. I will add some pictures soon enough to make this tutorial more understandable for newbies. If you don't undestand something (my English sucks) or have some problems/tips feel free to ask me. Check this thread from time to time for getting recent updates. Good luck with your first model ;).
-
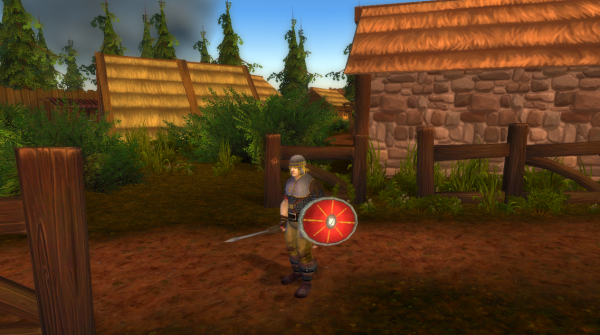 Yeah, as far as I recall, some shields especially from Cataclysm do that too. So, probably not that much of a bug.
 -
Won't this shield interfere with the cloak? It looks quite large.
-
Thank you for the report. Must be working now.
-
Indeed, it looks that way! Maybe you can try using a different cloud model if you specifically need some for your zone. There are some good fog models in Mists of Pandaria if I recall correctly.
-
Those clouds look better in the evening in my opinion. There is probably a way to do that, but I personally can't help with that as I am not very experienced in DBC editing too.
-
Since I am not the initiator of that, Khamul can tell you more. He asked me to build a draenei scene first.
-
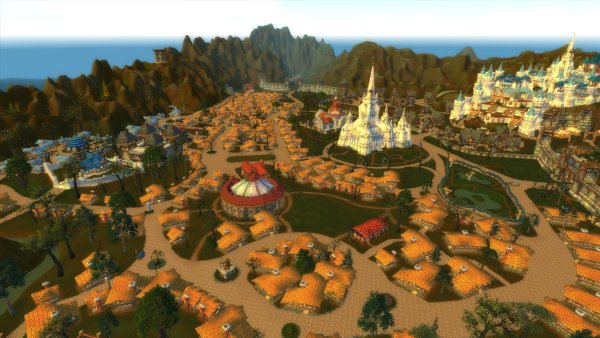
Good job. The atmosphere reminds me of Straglethorn a lot. I'd suggest you to change the water color a bit though. Also, there is a special gallery section on our website, where you can post your images within an album with description just like in the thread. People can leave comments there. This is way it won't be lost among questions and discussions and you will also be able to assign this gallery to a project page or smth.
-
I am already helping Khamul, and yeah, I am also quite busy with my uni studies and other things right now. Maybe we could cooperate on that a little when we have time.
-
Hi! Thank you for joining our forum! I think you should better make a project using our project system. I think it will be easier for other people to see your things then Also, you'd better specify what kind of job you require - a free based or a payed one. Speaking on a project itself, I think it is actually a really good idea to film something about another planets from WoW universe like Argus.
-
There very possible might be a crashing model. You just need to figure out what thing is crashing. And if it is a model, please let me know. I will upload a fixed version of the release then.
-
From the album: Schattenhain
-
It is entirely compatible with 3.3.5a. If you want to use it with later versions you would need to do some 010 editor edits. By default, it is 3.3.5a for now. Also, why not just asking that in comments? There was little point in making the thread.
-

[HELP] Animation bug with imported Cata model to LK
Skarn replied to Namiriu's topic in Retro-Porting
I don't know much about it, sorry. Maybe someone else will be able to help you. -
Version 1.0
4,474 downloads
Skarn's Model Resource Introduction And Future Plans What are those packs? There are a lot of neat models locked inside huge Blizzard's WMOs such as capital sities or dungeons, so I will cut those models out of there, edit them and release for you. So, everyone will be able to "legobuild" cities and dungeons right in Noggit or any other WoW Map Editor (P.S. Hello from 2015. Noggit is the only one working). The list looks this way for now: Stormwind, Silvermoon, Darnassus, Dalaran, Ironforge. Even after I finish with the captials, there would be so much other good stuff left. I would appreciate if someone would help me with building such database of resources. I will provide an in-depth tutorial covering the entire process soon enough.Other capital cities are to come soon. This package contains the entire (except for some models) Gilneas city sliced into separate models. You can practically build an entire city using them. There are houses, bridges, streets, gates, channel sidewalks and a lot more. Can't wait to see your creations based on these models! Installation: Unpack the .ZIP archive, open WMOs folder and add the two folders containing there into your patch or working directory. Copy the content of import.txt to your Noggit 'import.txt'. Enjoy building! Here I am releasing multiple packs containing different slices from Stormwind. Every pack is themed on a parcticular Stormwind quarter. This pack requires Cataclysm textures for Stormwind which are not yet included in the pack! Cathedral Quarter This pack contains various standalone rich houses of Cathedral Quarter, Cathedral, different street elements and gates. Bonus: Detached elements of Cathedral which can be used in legobuilding. Keep This pack is full of towers, walls, decorative elements and other parts of the Stormwind Keep. Useful for building your own castles and keeps right in Noggit. Mage Quarter Separate houses, entire streets and a lot of walls and towers. Old Town A lot of canal models, houses and other environment from the Old Town of Stormwind. Dwarf Quarter Many house models and walls. If there are any bugs, don't hesitate to comment. Happy modding. -
Great job, definitely useful release. I wish I could work with VB.net myself to use it.
-
[HELP] Animation bug with imported Cata model to LK
Skarn replied to Namiriu's topic in Retro-Porting
PyModelEditor most likely. -
[HELP] Animation bug with imported Cata model to LK
Skarn replied to Namiriu's topic in Retro-Porting
The animation may be named in the wrong way, I'd guess.
") Happy modding, everyone.
Happy modding, everyone.